Goal templates can be made required. If a goal template is required, then it will automatically become part of the Goal Plan of everyone in the template’s audience.
To create a required goal, from the Administrator's Console, click Talent > Administer Goal Templates.
The following screen will appear:
Click the Add button. The following screen will appear:
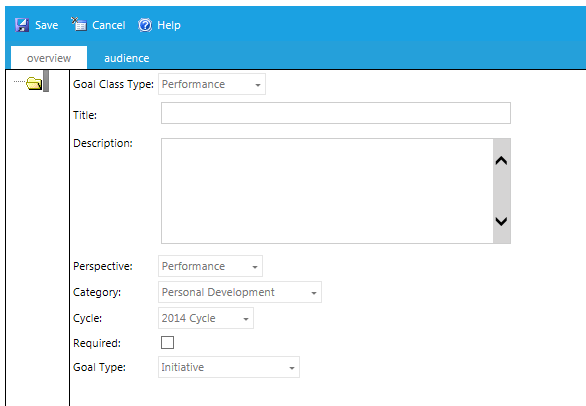
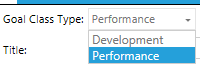
For the Goal Class Type, select if the goal will be a Development goal or a Performance goal.
Enter the goal in the title field. This is what will appear on the end-user’s goal plan.
The description is optional. The text entered here will appear in the Outcome field to the end-user.
A portion of the end-user screen is displayed below.

Select a Perspective, if desired. Perspectives can be used to categorize goals for reporting purposes. To enter Perspective options into your system, go to Talent > Administer Perspectives.
Select a Category, if desired. Since a required goal is automatically added to users’ plans, the category would only be used for reporting purposes. To enter category options into your system, go to Talent > Administer Categories.
Click on the Cycle drop-down list and make a selection. To enter cycle options into your system, go to Talent > Administer Cycles.
The Required check box will make the goal required. When a goal is required, it will automatically be pushed out to the Goal Plan of everyone in the goal template’s audience.
Select which type of goal this template should be configured as.
A target goal type allows an administrator to select a Key Performance Indicator (KPI) and then set a target for that indicator. When a target goal type is selected, the screen will refresh to display several more options.
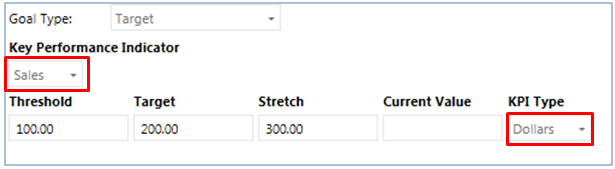
Select which KPI should be used for this goal template. The KPI type will default to the corresponding value based on the KPI that was selected.
The options for Key Performance Indicator and the corresponding KPI Type can be set on the Talent > Administer Targets screen.
Since this is a required goal, the employee cannot change the target. They can only show their progress towards meeting the goal.

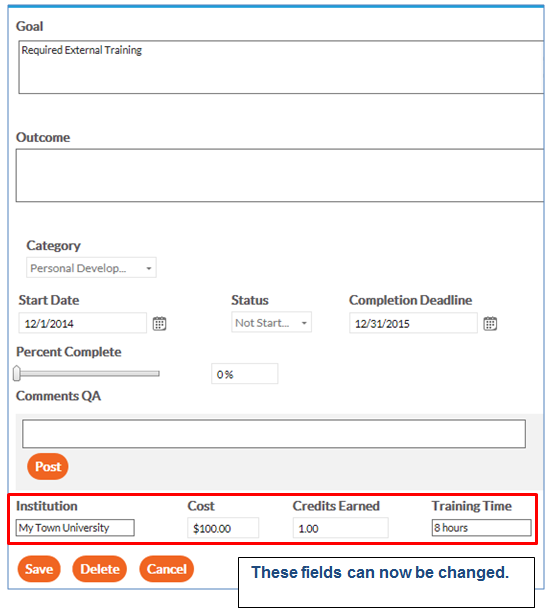
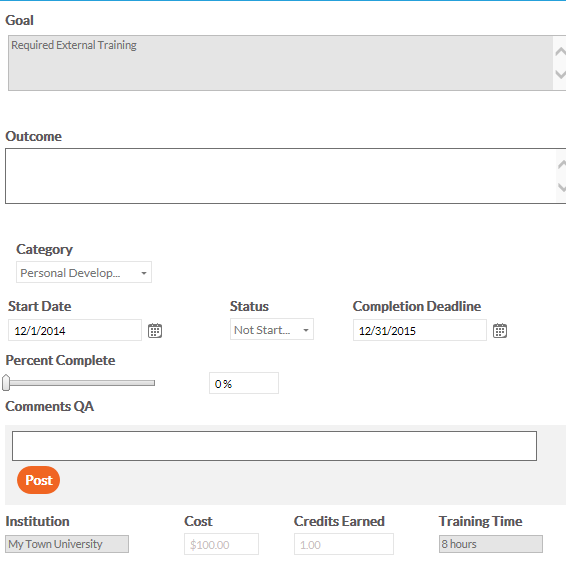
The External Training goal type allows an administrator to detail a specific external learning event and then associate a goal with that event. When the external training type is selected, the screen will refresh to show several additional options.

Enter the name of the Institution, the cost, credits earned, and training time into the corresponding fields.
Since this is a required goal, the employee can only record their progress towards meeting the goal; they cannot change the information in the Institution name, cost, credits earned, or training time fields.
Initiative is the default goal type. Enter a title and description for this goal.
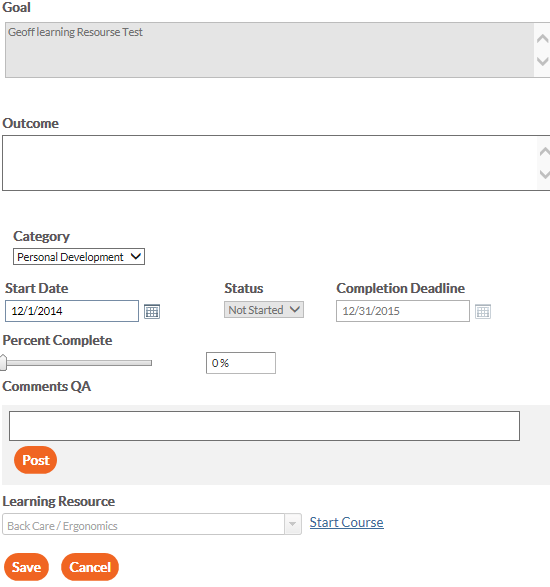
For the Learning Resource goal type, it allows an administrator to select a Learning Resource from the LMS and associate a goal with the completion of that course. When the Learning Resource type is selected, an additional drop-down box will display, allowing you to select the Learning Resource.
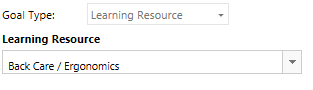
Since this is a required goal, the user cannot change the Learning Resource. When the goal is added to the user’s Goal Plan, there will be a link to the course. Once the course has been completed in the LMS, the LMS will automatically update this goal to complete.
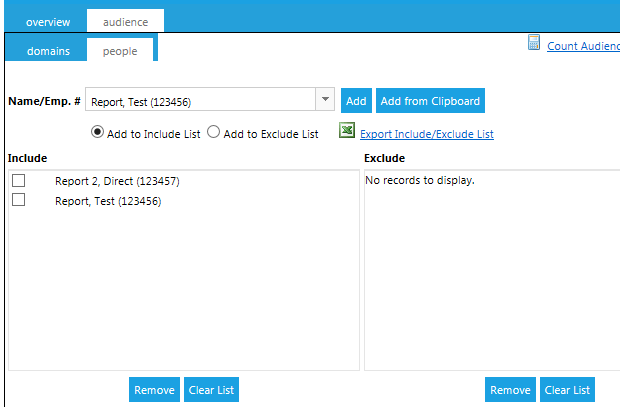
Click the Audience tab and designate a specific audience. If no audience is selected, this goal will be pushed to everyone’s goal plan.
Click the Save button. Once the goal is saved, it will be pushed to the Goal Plan of everyone in the selected audience.
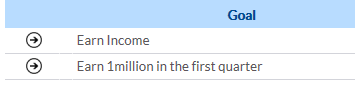
If desired, subgoals can be created to give users concrete steps in order to complete the entire goal. Subgoals will appear directly below the goal on a user’s goal plan, as shown below.
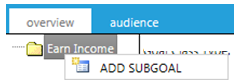
To create a subgoal, right-click on the goal title in the left-side panel and click Add Subgoal.
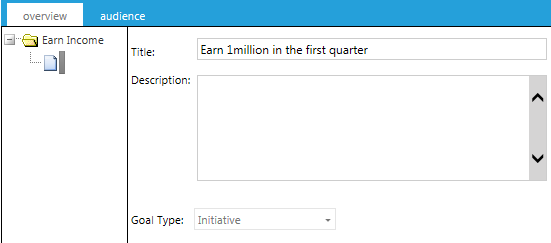
Type a Title, Description, and select a Goal Type from the drop-down list as shown:
Click the Save button.
Repeat to add as many subgoals as needed.
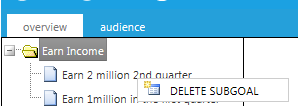
To delete a subgoal, right-click on it and click Delete Subgoal.
Click the Save button.
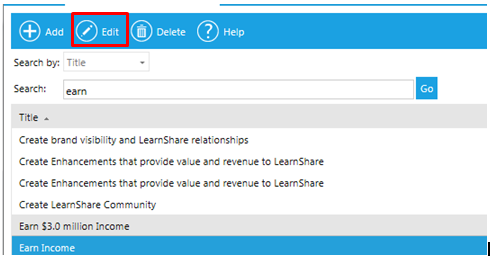
The search screen will initially display all goal templates. Use the Search feature to limit your choices. Then, select a goal and click the Edit button:
When changes are made to a required goal, the changes will only be visible to any new members of the audience. Users who were in the goal audience before the changes were made will still see the original goal.
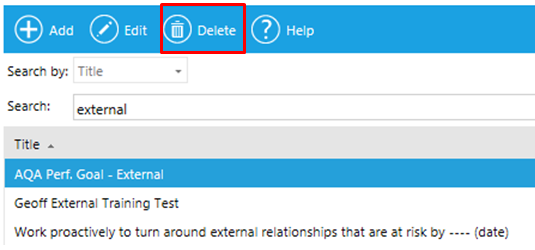
To delete a required goal, select the goal template and then click Delete.
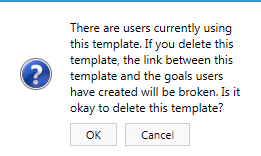
The system will show a warning box. Click OK to complete the deletion.
When a required goal has been deleted, it will still be shown on the Goal Plan of users who were in the required audience. However, it is essentially now a goal template. This means that the end-user can make changes to the goal and even delete it, if desired.
Pictured below is how a deleted required goal would appear to an end-user.