The Learning Management System’s reporting function allows you to generate a number of learning activity reports in a variety of formats. Reports are saved in the LMS for 30 days and can also be emailed to you as a link. The reporting function can be easily customized, and the standard set of reports can be modified for the needs of your organization.
The LMS gives you the option to access the Report Catalog from either your home page or from the Administrator's Console. You may only report on individuals and learning resources within your span of control.
There are three types of reports in the LMS:
| Report Type | Description |
| Standard |
LearnShare created reports that are available to all clients. Though these are standard, some minor modifications can be made for each organization.
|
| Ad Hoc | You can build Ad Hoc reports using the Report Wizard, which can be accessed through Administer Reports from your Reports pull-down. The reports are available to Report Users in the Report Catalog based on the audience mapping that you define. Typically LMS Administrator access is required to access the Ad Hoc tool. |
| Custom | These are reports that LearnShare creates specifically for your company.
Typically, these are reports that cannot be created in the Ad Hoc tool and there is usually a cost for their development. |
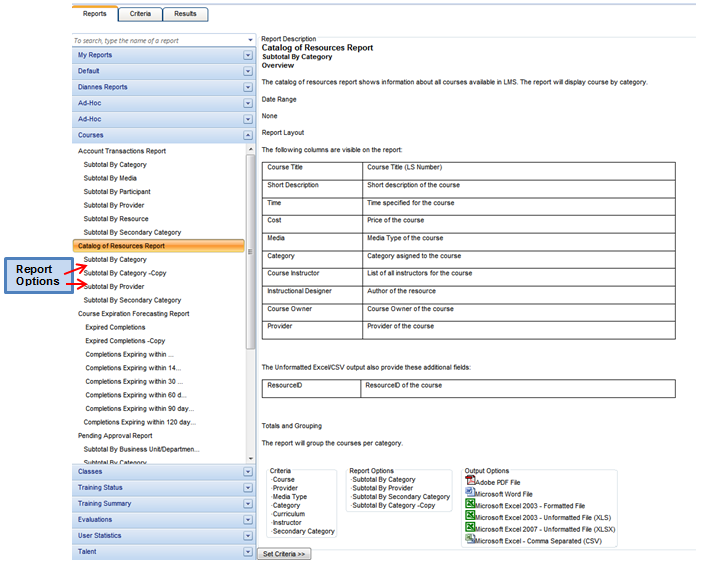
As you begin to generate reports in the LMS, you will notice that many of the reports have the same basic structure and similar options. The terms below are ones that you will find in reference to most LMS reports.
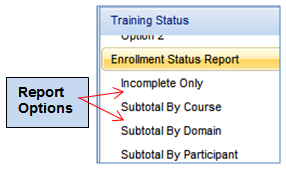
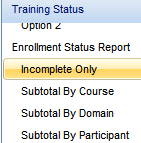
On the left side of the Report Catalog, the report options are listed directly below the report title. The options can also be found at the bottom of the report description (for Standard reports). The options allow you to run different versions of the same report.
For example, the Enrollment Status Report will always report on the enrollment status for the selected criteria. However, the Incomplete Only option will not show Completed statuses, and the other options will look at different data by which to subtotal the information. Thus, the options allow you to view the same information in different formats.
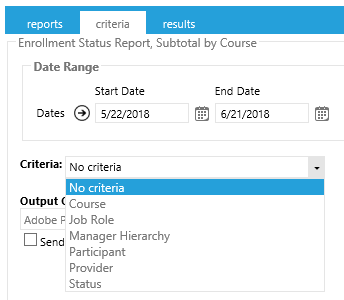
The criteria allows you to narrow the results on your report. Each standard report may have different criteria options, depending on what makes sense for that report. Additional criteria can often be added to standard reports based on the needs of your organization.
Listed below are some common criteria included in many of the standard reports.
| Criteria | Description |
| Course | This criteria allows you to determine the specific course(s) that should appear on the report. |
| Participant | This criteria allows you to determine the specific user(s) who should appear on the report. |
| Manager | This criteria allows you to select a manager and then all of the manager’s direct reports will appear on the report. |
| Manager's Hierarchy | This criteria allows you to select a manager and then all of users who report to that manager will appear on the report. |
| Class | This criteria allows you to select specific class sessions to appear on the report. |
| Job Role | This criteria will list all of the job role options in your LMS, based on your system’s job role domain. One or more job roles can be selected, which will narrow your results to only users who are in the selected job role(s). |
Many reports require you to select a date range, which will limit your results to only activity that occurred during the selected time period.
The Date Range can vary among reports. The date range for one report may refer to the completion date, while on another report it may refer to the enrollment date. When running a report, it is important to view the report description and note what data will be used for the date range.
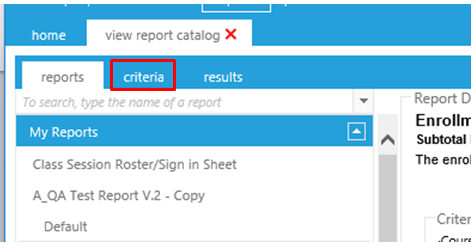
When a user initially accesses the Report Catalog, they will be presented with a screen similar to the one pictured below. This is the same screen that an administrator will see when selecting Reports > View Report Catalog from the Administrator's Console.
This screen allows the user to search for a report by topic or by report title. When a standard LearnShare report is selected, a complete description of the report will appear.
Once you have decided which report to run, follow these steps to run the report.
From the Report Catalog, find the report in the left column and then select the appropriate report option, listed below the report title.
In the example below, the Enrollment Status Report is the selected report. Incomplete Only is the selected report option.
Click the Set Criteria button.
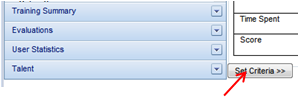
This will take you to the Criteria tab.
On this tab, you can:
You can select the date range field from the list of possible relative dates or you can enter your own set date range.
If this report will be set up to run as a scheduled report, selecting a relative date will assure that your scheduled report is always showing the most current data.
Click on  Variable Date Range icon to see the list of relative dates.
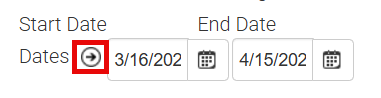
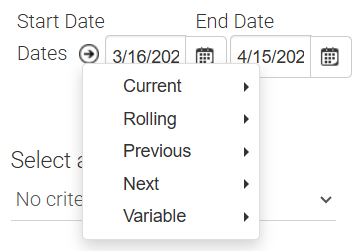
The date options will expand to show the following:
| Date Option | Description |
| Day | The date range will be today's date, from 12:00 AM through 11:59 PM. |
| Week | The date range will be Sunday through Saturday of the current week. |
| Month | The date range will be from the first day of the current month through the last day of the month the report is generated. |
| Month to Date | The date range will be from the first day of the current month through 11:59 PM of the day the report is generated. |
| Quarter | The date range will be from the first day of the current quarter through the last day of the quarter the report is generated. |
| Quarter to Date | The date range will be from the first day of the current quarter through 11:59 PM of the day the report is generated. |
| Fiscal Quarter | The date range will be from the first day of the current fiscal quarter through the last day of the fiscal quarter the report is generated. This option is only available in systems that have a defined fiscal year. |
| Fiscal Quarter to Date | The date range will be from the first day of the current fiscal quarter through 11:59 PM of the day the report is generated. This option is only available in systems that have a defined fiscal year. |
| Year | The date range will be from January 1 through December 31 of the current year. |
| Year to Date | The date range will be from January 1 through 11:59 PM of the day the report is generated. |
| Fiscal Year to Date | The date range will be from the first day of the current fiscal year through 11:59 PM of the day the report is generated. This option is only available in systems that have a defined fiscal year. |
| Fiscal Year | The date range will be from the first date of the current fiscal year through the last date of the current fiscal year. This option is only available in systems that have a defined fiscal year. |
The rolling date options are, as follows:
| Date Option | Description |
| 24 Hours |
The range will be from the moment the report is run until 24 hours in the past. So if the report is run at 8:00 AM today, the results will be from 8:00 AM yesterday to 8:00 AM today. *Note that this applies to DATE and TIME - starting the moment the report is running. As an example, the Rolling/24 hour events that will be reported if I run the report NOW will include only Nov 15 2018 at 2:02 PM through Nov 16 2018 at 2:02 PM. |
| 48 Hours |
The range will be from the moment the report is run until 48 hours in the past. So if the report is run at 8:00 AM today, the results will be from 8:00 AM 48 hours ago to 8:00 AM today. *Note that this applies to DATE and TIME, starting the moment the report is running. As an example, the Rolling/48 hour events that will be reported if I run the report NOW will include only Nov 14 2018 at 2:02 PM through Nov 16 2018 at 2:02 PM. |
| 7 Days |
The date range will be from midnight 7 days ago until today at 11:59 PM. *Note that this applies to DATE and TIME, starting the moment the report is running. As an example, the Rolling/7 day events that will be reported if I run the report NOW will include only Nov 9 2018 at 2:02 PM through Nov 16 2018 at 2:02 PM. |
| 30 Days | The date range will be from midnight 30 days ago until today at 11:59 PM. |
| 90 Days | The date range will be from midnight 90 days ago until today at 11:59 PM. |
| Year | The date range will be from midnight on this date last year until 11:59 PM today. |
The previous date options are, as follows:
| Date Options | Description |
| Day |
The date range will be from midnight through 11:59 PM of one day prior to the day the report is generated. *Note that this applies to DATE only. For example, I am typing this on Nov 16 2018 at 2:02 PM. The Previous/Day selection will only report events from Nov 15 2018, regardless of time of day. |
| 7 Days |
The date range will be from midnight of seven days prior through 11:59 PM of the day before the report is generated. *Note that this applies to DATE only. For example, I am typing this on Nov 16 2018 at 2:02 PM. The Previous / Day selection will only report events from Nov 9 2018, regardless of time of day. |
| 14 Days | The date range will be from midnight of 14 days prior, through 11:59 PM of the day prior to the day the report is generated. |
| 30 Days | The date range will be from midnight of 30 days prior, through 11:59 PM of the day prior to the day the report is generated. |
| 12 Months | The date range will be from midnight of 365 days prior, through 11:59 PM of the day prior to the day the report is generated. |
| Year | The date range will be from January 1 through December 31 of the prior year. |
The next date options are, as follows:
| Date Options | Description |
| Day | The date range will be from midnight through 11:59PM of one day after the day the report is generated. |
| Week | The date range will be Sunday through Saturday of the following week. |
| Month | The date range will be from the first day of the following month through the last day. |
| Quarter | The date range will be from the first day of the following quarter through the last day. |
| Year | The date range will be from January 1 through December 31 of the following year. |
The variable date options are, as follows:
| Date Options | Description |
| Dates | The date range will be a user generated static start date through static end date. |
| Day After Today | The date range will be from today and X days after today's date. The X can be any number of days from 1-999. |
| Day Before Today | The date range will be from today and X days before today's date. The X can be any number of days from 1-999. |
| Days Before and After Today | The date range will be from today, and X days before and X days after today's date. The X for before and after can be unique, and any number of days from 1-999. |
Once you have selected the date range, you need to select a criteria, if a criteria is required.
Once a criteria type is selected, a detailed list of the possible options will appear on the right side of the screen.
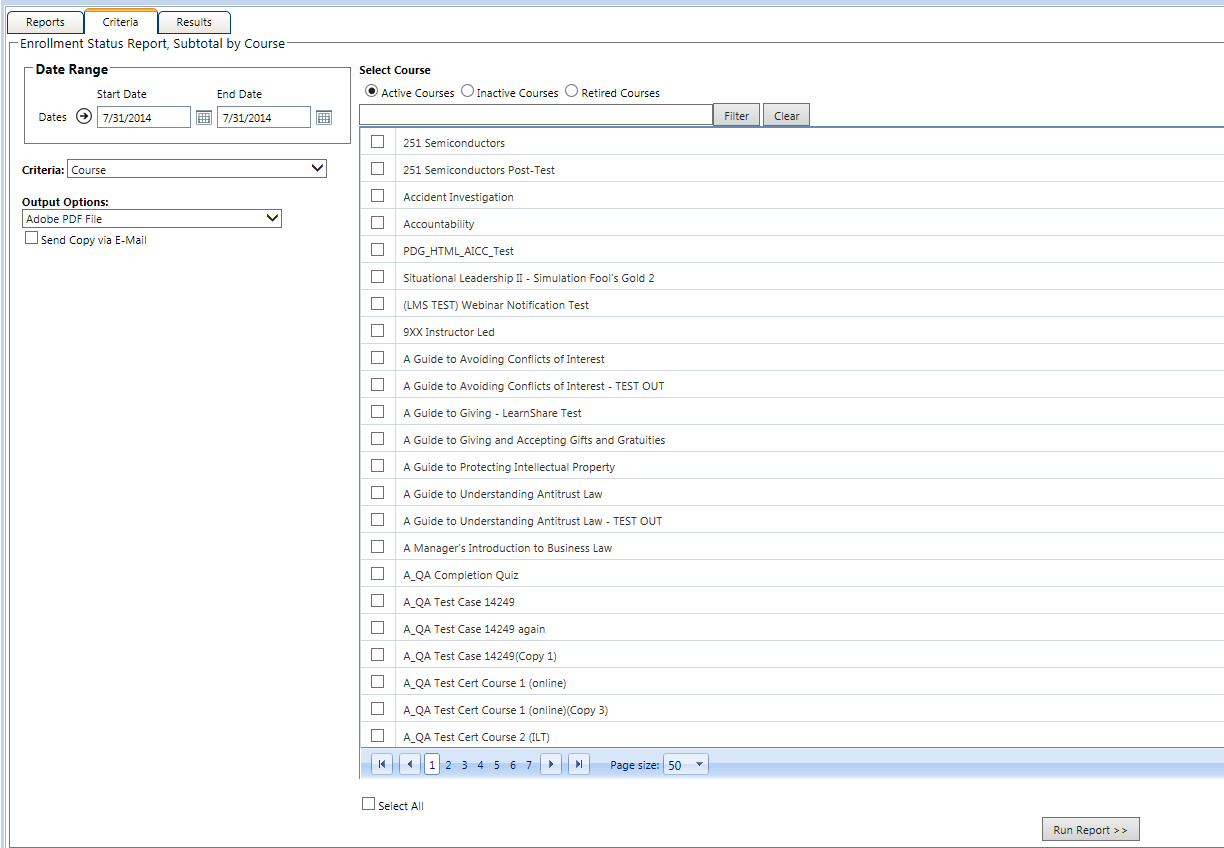
The criteria options will vary based on the report. Listed below are tips on some of the most commonly used criteria.
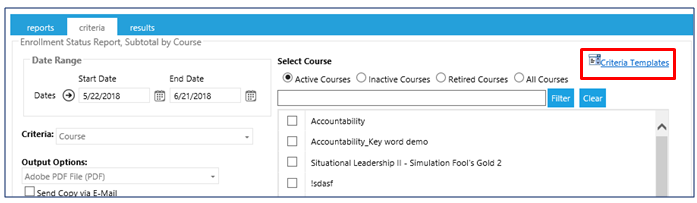
Course - Typically you will need to first select if the course is Active, Inactive, or Retired to ensure that your selected course(s) will appear in the list.
Participant - There are two ways that a participant’s name can be added.
Filter Box - This is available on criteria that contain long lists of options. Type a common term in the filter box and click Filter. The options list will now be limited to items that contain that term.
Select All - The Select All checkbox can be found at the bottom of most lists. Checking this box will automatically select all possible options currently being displayed.
If the filter has been used to limit the listed criteria, the Select All option will only select criteria falling within the filter parameters.
Output Options - The final decision that needs to be made is selecting an output option. The majority of reports will offer the following output options:
Selecting the correct option will depend on what is available within the report and your personal preference.
If a report includes a graph, the Adobe PDF version should be selected in order to view the graph.
Additional columns of information may be available when an unformatted or CSV version is selected.
Use the Web Query output, if available, if you are going to create charts and graphs in Excel and want the ability to easily update these items with new data when a new report is run.
Be sure to read the report description on the standard reports to help make the best decision on the output option.
If you need to retain report results long-term, be sure to run the report as a PDF or Excel file and save the report results outside of LearnShare. After a period of time, report results will disappear from the View Recent Reports screen and will no longer be accessible.
Users with the Company Administrator role will have an option to "Require Authenticated Access to Report Output". This allows the administrator to temporarily enable or disable enhanced security by forcing authentication for links to report results sent via email or other means. This option is to help control authentication, when it is not desired if the report is required for automated extracts, etc.
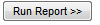
Once all of the selections have been made, click Run Report at the bottom of the Criteria tab to run the report.
This will take you to the Results tab.
Report Criteria Templates allow a report user to select a set of criteria (that is, courses, users, etc.) and then save that criteria so it can be reused in future reports.
This is an optional feature that is not available in all systems.
To create a criteria template:
Open the Report Catalog.
Select a report.
Click on the Criteria tab.
On the Criteria tab, you must select a criteria from the Criteria drop-down.
Select the specific set of criteria that will become the template.
The listed criteria will vary by report and system.
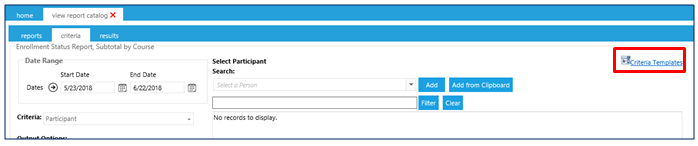
Click on the Criteria Templates link.
The criteria templates link will not display until a criteria option has been selected.
The Manage Selection Templates pop-up box will open.
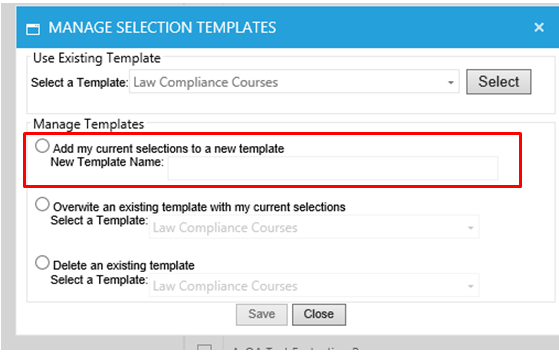
Under Manage Templates, select the option to add current selections to a new template. Then, enter a template name in the text box.
Click Save.
The selected courses in this example are now a template, which can be used in future reports.
Once the template has been created, it can now be used on any future report that has an appropriate criteria (for example, course, selected domain, etc.).
To apply the template:
Go to the Report Catalog.
Select the desired report.
Go to the Criteria tab.
Select the desired Criteria option in the Criteria drop-down list.
Click on the Criteria Templates link.
The Manage Selections Template pop-up box will open.
At the top, select the desired template from the Select a Template drop-down. Only templates using the corresponding criteria will appear as options.
For example, the participant criteria was selected for this report, so the only templates displayed use the Participant criteria.
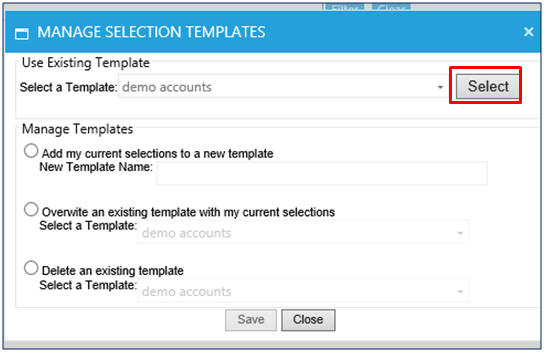
Once you have chosen the desired template, click Select.
The screen will refresh and will now display the selected criteria.
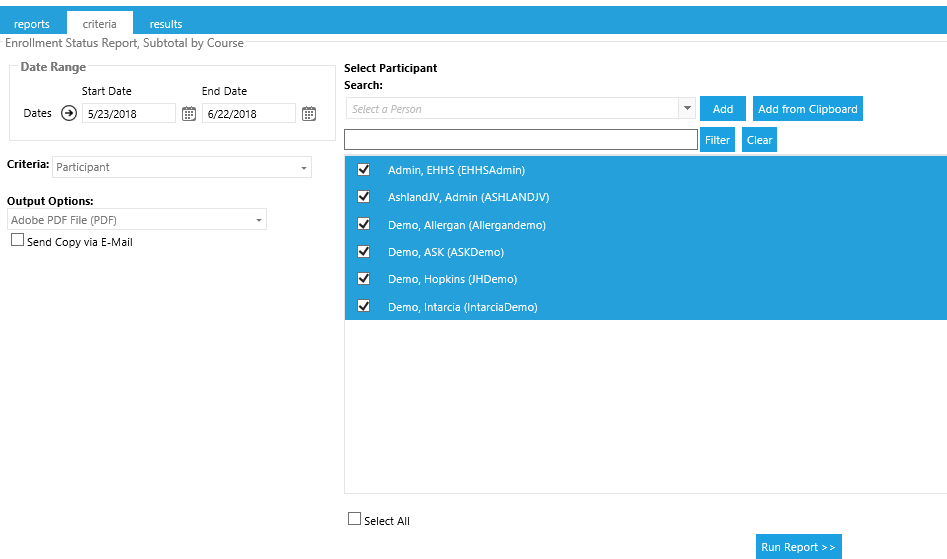
If required, changes can be made. If no changes are needed, click Run Report.
Use this option to change the selections of an existing template. The selected template name will remain the same, but the actual criteria will change.
To overwrite a template:
Go to the Report Catalog.
Select the desired report.
Go to the Criteria tab.
Select the desired criteria option in the Criteria drop-down list.
Select the specific criteria that should be used for this template (specific users, courses, etc.).
If you are just making minor changes to the existing template, first select the existing template so specific criteria is displayed. You can then add to or delete these selections. Once all selections have been made and the revised criteria is correct, move on to the next step.
Click on the Criteria Templates link.

The Manage Selections Template pop-up box will open.
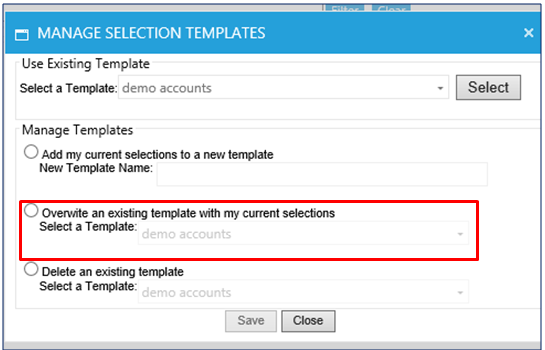
Select the option to Overwrite an existing template.
Select the desired template in the drop down list, and then click Save.
The template will now reflect the changes.
Use this option to delete an existing template.
To delete a template:
Go to the Report Catalog.
Select the desired report.
Go to the Criteria tab.
Select the desired criteria option in the Criteria drop-down list.
Click on the Criteria Templates link.

The Manage Selections Template pop-up box will open.

Select the option to Delete an existing template.
Select the desired template in the drop down list, and then click Save.
The Results tab shows all of your recently run reports. If you have just run a report, the screen will will automatically refresh until your report is ready to view.
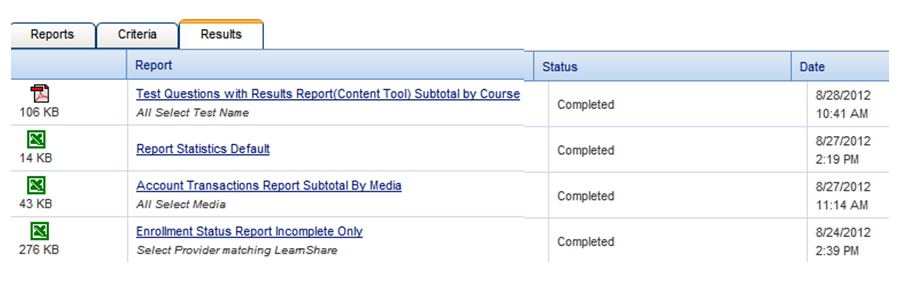
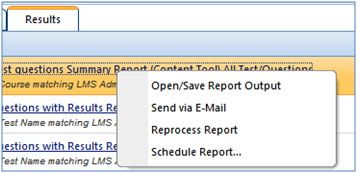
When the report status shows as Completed, click on the report title to open the report results. You can also right-click on a report title to expose other options.
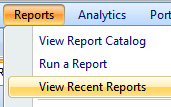
At any time, you can go directly to the Results tab to view previously run reports by going to Reports > View Recent Reports.
If you need to retain report results long-term, be sure to run the report as a PDF or Excel file and save the report results outside of LearnShare. After a period of time, report results will disappear from the View Recent Reports screen and will no longer be accessible.
This process allows LMS users to schedule user reports to be run on a regular basis and be emailed out to specific people.
Each report has a different set of options used to define the results. The steps below cover the most common reporting options. These apply equally to standard reports provided with the system and those built by a Company Administrator using the Ad Hoc Reporting tool.
The Schedule Report feature allows you to run a report one time and then set regularly scheduled time to have the LMS rerun that report for you. Once the scheduled report has been run, the LMS will email the report link to all of the recipients. The recipients can launch the report directly from the email, there is no need to log into the LMS.
Before scheduling a report, you must run the report with the exact criteria, date range, etc. that should appear in the scheduled report.
Remember to use a flexible date range in your report so that the scheduled report is always showing the most current information.
Remember that the report results will be based on the permissions of the user who ran the original report; it will not be based on the recipient’s report permissions.
Once the report has been run, you can access the completed report through the Results tab of the Report Catalog.
Right-click on the completed report to see the report options.
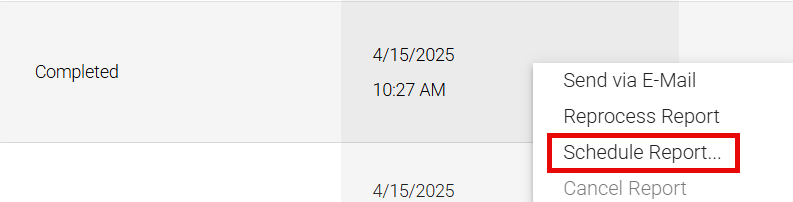
Select the Schedule Report option.
The Report Scheduling pop-up screen will appear with the schedule tab displayed.
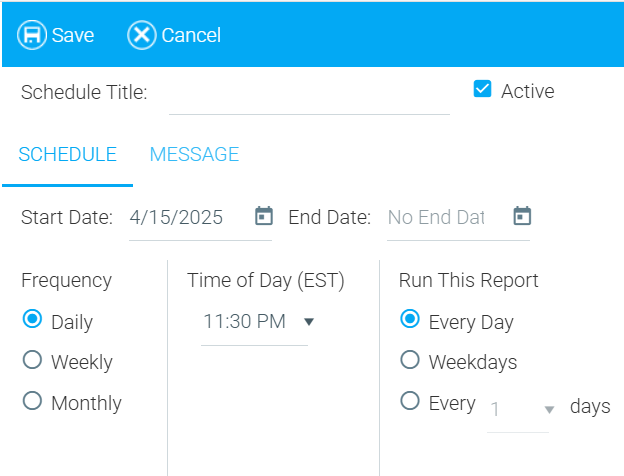
Enter a Schedule Title. The Schedule Title uniquely identifies this schedule. It is also the subject of the email message that is sent out with the report.
The Active box is checked by default. When this box is checked, the system will run the report as scheduled. Unchecking this box will cause the schedule to show as inactive on the Scheduled Reports screen, and the report will not run as scheduled.
Select a schedule frequency. Options displayed will vary depending on which you choose.
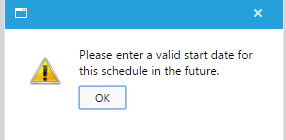
Select a Start Date if a future date is desired. If no Start Date is selected, the Start Date will default to the current date.
If the selected time of day is already in the past for today, then you must select a future date. The LMS will not save a scheduled report if the start date and time is in the past.
Enter an End Date if desired. This field can be left blank.
Use the Time of Day drop-down to select when the report should be run. Remember that all report run times are in Eastern Standard Time (EST).
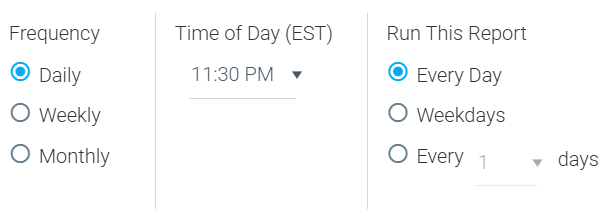
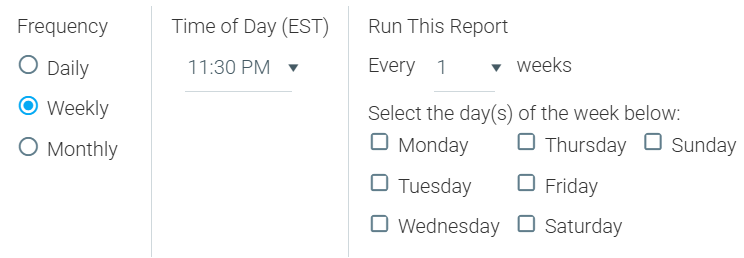
Use the Frequency radio buttons to choose when you wish your report to run. This section will offer different options for when you click Daily, Weekly, or Monthly.
Daily
The daily option allows the report to be run every day, only weekdays, or spanning a set duration (every two days, every three days, etc.).
Weekly
The weekly option allows the report to be run on one or more specific days, either every week or spanning a number of weeks (for example, every two weeks,etc.).
Monthly
The monthly report option allows the report to be run on specific days for one or more selected months. You may specify the day of the month, or select last to set the report to generate the last day of the selected months.
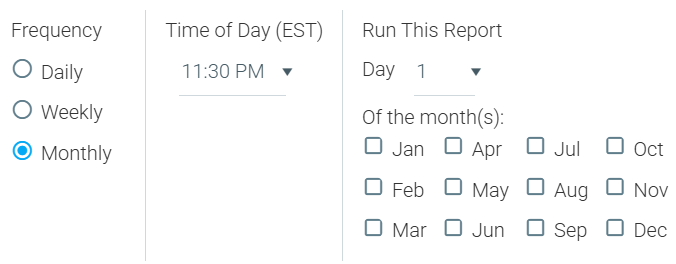
If a report needs to be run quarterly, select which months of the year (for example, every three months) to run the report. If a report needs to be run yearly, select one month of the year and which day of that month you’d like to run it.
Select a Time of Day from the drop-down list. The system will run this report at the time selected.
If a report needs to be run with the multiple schedules, the report will need to be run twice and a schedule setup for each run. Multiple schedules can be active at the same time for the same report with the same options/criteria.
Click on the Message tab.
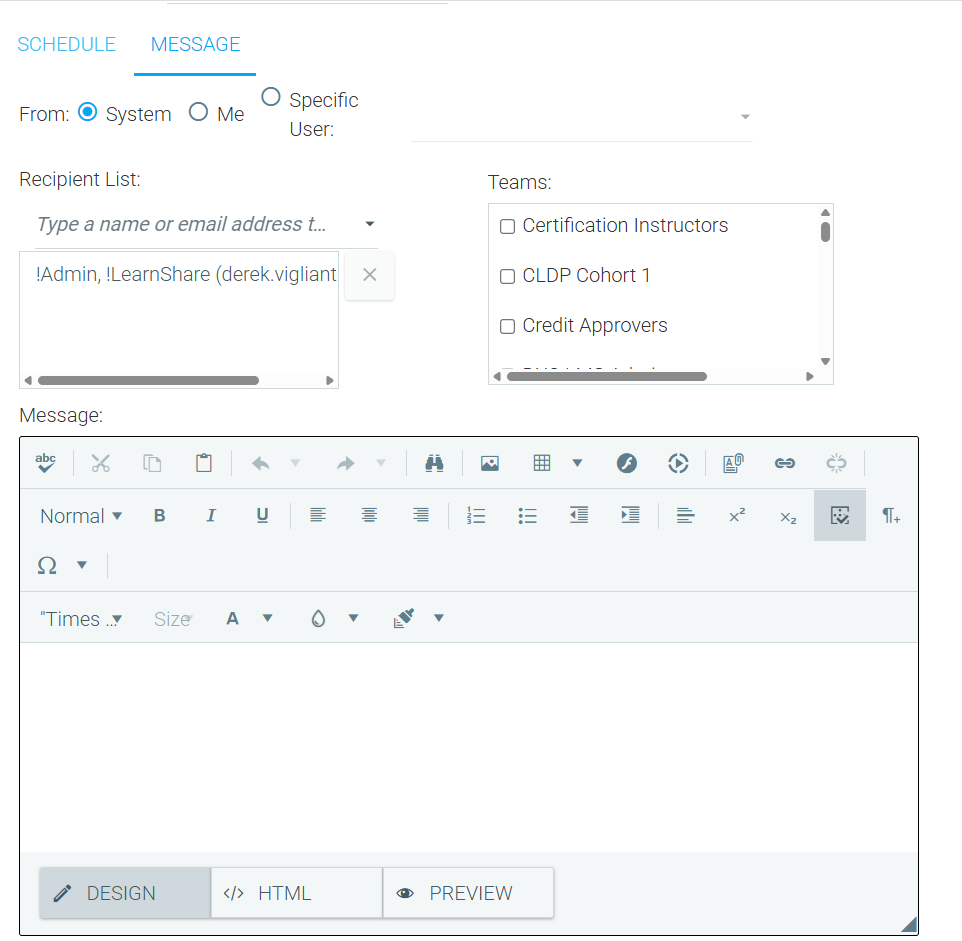
Use the From field to determine who the email should appear to come from.
Recipient List: Begin typing the name(s) of who should receive the scheduled report. All recipients must have an email address associated with their LMS account.
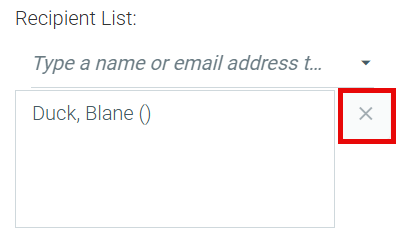
By default the user who is creating the scheduled report will be listed in the Recipient list. Click the x to the right of the name to delete it, if desired.
A team of users can also be selected to receive the scheduled report.
Enter any text that should accompany the report in the Message field.
Click Save when you are finished.
Reports may be displayed on the Report Catalog in Report Groups. Titles and the order in which Report Groups are displayed can be modified by a Company Administrator. Your organization's LMS access and permissions may differ from this standard. Please contact your organization's Company Administrator if you have questions about your access to the LMS.
On the System Admin Console, go to Reports > Maintain Report Groups.
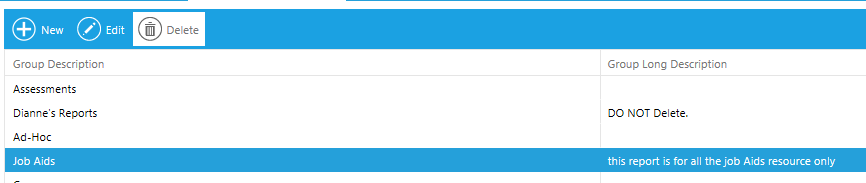
The Maintain Report Groups screen will appear.

Click the New button. The following screen will appear:
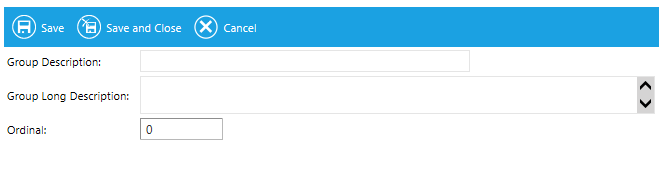
Type a report group name and description.
Type an Ordinal (you can start with "0"). This will determine in what order this group will appear in the list when users pull it up in the system.
Groups having the same ordinal will appear in alphabetical order.
Click Save. Your report group will now appear on the list. You can also click Cancel to discard the group without saving.
A report group will not appear in the system until it contains actual reports.
From the Report Group screen, select the group you wish you edit, and click the Edit button and perform the updates.

Click Save when you are finished, or Cancel to discard your changes without saving.
A report group may be deleted, even if it contains active reports. However, the reports contained within it will not be lost. Once deleted, a report group's contents will be automatically moved to the Default group.
On the System Admin Console, go to Reports > Maintain Report Groups.
On the Report Groups screen, highlight the group name, then click the Delete button.
The Report Group is removed from the list and is no longer available for selection when creating or modifying reports.
A report group that contains no reports will not be displayed on the Report Catalog. For this reason, you may see more report groups in this listing than you see in your Report Catalog.
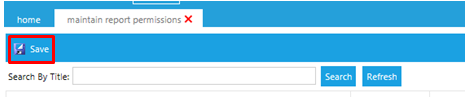
The Maintain Report Permissions screen allows you to organize the Report Catalog and to set up report permissions based on security roles.
In the Administrator's console, go to Reports > Maintain Report Permissions.
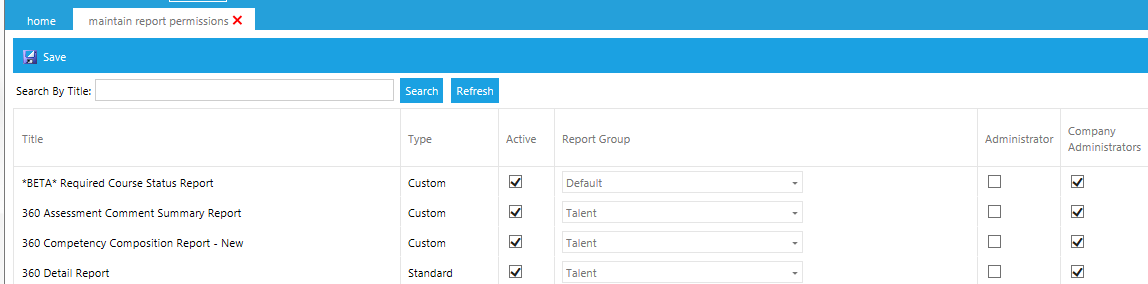
This screen will display the information described in the sections below.
Type the name (partial entries are accepted) of the report that you need to edit, and the system will limit the list of reports.

The column descriptions are, as follows:
Title: Report Title
Type: The type of report. Options are:
Active: A checked box indicates that the report is active. Uncheck the box to make the report inactive. An inactive report will not be visible in the Report Catalog.
Report Group: Use the drop-down box to select which report group it should be listed under in the Report Catalog.

Additional report groups can be added through the Reports > Maintain Report Groups screen.
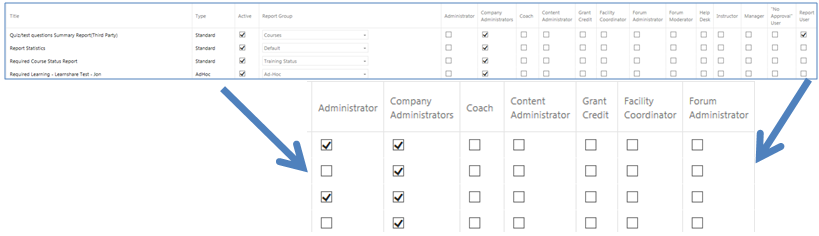
All of the security roles available in your system will be listed on the right side of the screen. Use the check boxes to designate the security roles that can access specific reports in their Report Catalog.
The default is for the Company Administrator role to have access to all active reports; however, this can be changed.
More targeted audience mapping for reports is available through the Administer Reports screen.
Once all of the desired changes on this screen have been made, click Save.