Processing the Batch Upload
To upload batch enrollment data, go to People > Batch Load Enrollments in the administrative menu. The first screen of the Batch Course Enrollment wizard will open.
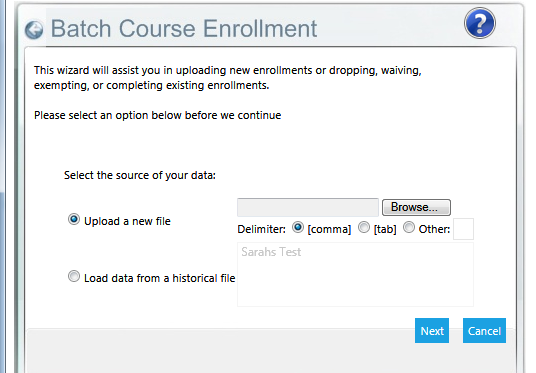
Select the Data Source:
- Upload a new file
- This is default choice. Click the Browse button to upload an Excel file from your computer or network drive. The file should have been saved as a CSV file; make sure the selected delimiter is comma. If your file is not in CSV format, you may specify another delimiter for your import file. Select “tab”, or specify a character in the “other” field that would be used for a delimiter (such as a pipe character (“|”), etc)
- Load data from a historical file
- You may save previously uploaded files and then choose to process them at a later time. Select the file from the available list.
Click Next. The system will scan the file and alert you to invalid data rows. You can then choose what to do about the invalid data.
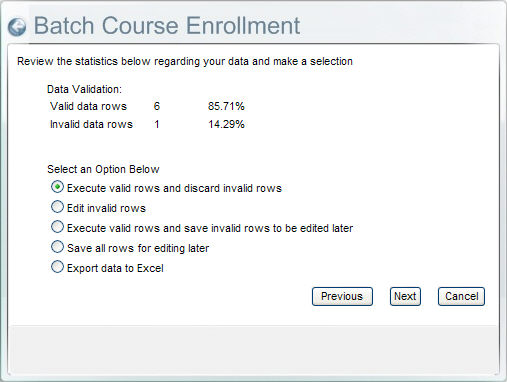
- Execute valid rows and discard invalid rows
- This is the default option. When this option is selected, the system will upload your valid data rows and ignore/delete the invalid rows. Click Next and you will be directed to the final settings screen.
- Edit invalid rows
- When this option is selected, you will see a pop-up box that displays only the rows in question. See below for the steps of this process.
- Execute valid rows and save invalid rows to execute later
- This option allows you to upload the valid rows and save the invalid rows to be edited at a later time. Click Next and you will be directed to the final settings screen.
- Save all rows for editing later
- This option allows you to simply save the file for a later time. Click Next and you will be directed to the final settings screen.
- Export Data to Excel
- When this option is selected, you will be prompted to either open the file or save the file. Once the file has been opened/saved, you will be automatically taken to the final screen of the wizard.
Editing Invalid Rows
If you choose to edit invalid rows within the Wizard, click the Next button. A window showing the invalid rows of data will openand an Edit link will appear at the far left of each row. When you click the Edit link, the reason for the error will be shown at the bottom of the window and the information on that row will open up in editable field form.
Use the text boxes to edit each incorrect row. When finished editing, scroll down to the bottom of the screen and click the Update link. Or click Cancel to return to the previous screen.
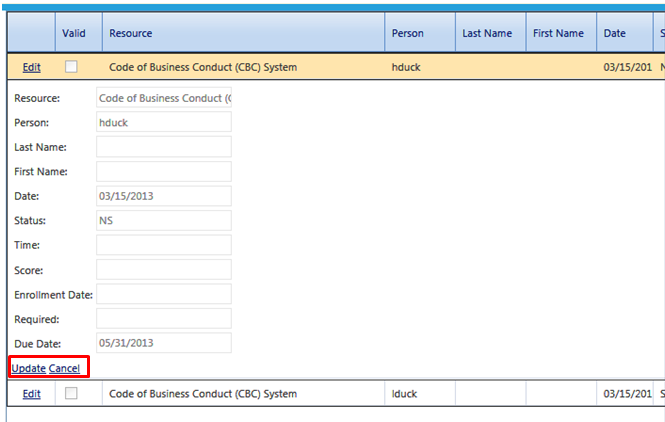
When an invalid row has been correctly updated, the valid box will be automatically checked.
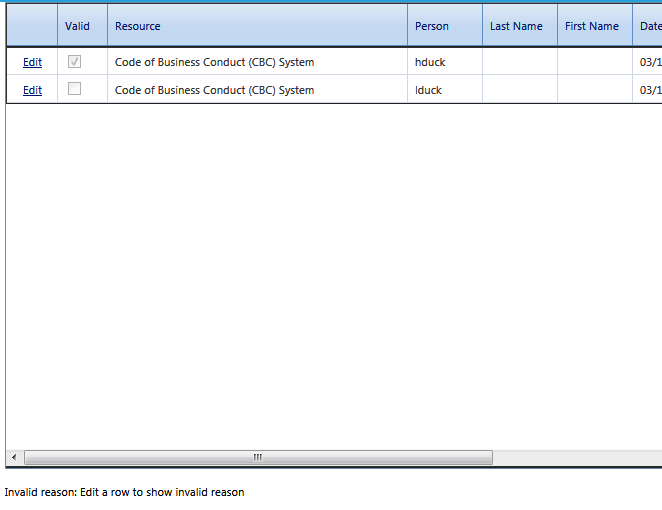
Repeat these steps until all invalid rows have been updated.
Once all of the invalid rows are corrected, close out of the pop-up box then change your initial selection to “Execute valid rows and discard invalid rows”
Click Next and you will be directed to the final settings screen.
Settings Screen
Once the option on how to process the upload has been selected, click Next and the following screen will appear.
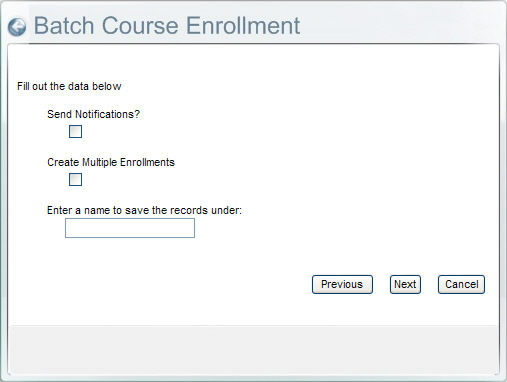
- Send Notifications
- Check the Send Notifications box if you would like for employees to receive an enrollment notification when the batch upload is processed. The Send Notifications box is only relevant if the batch upload is being used to process enrollments. There is no notification for any other transaction type.
- Create Multiple Enrollments
- Check this box if there are users on the batch upload that have previously completed the course and they need to receive an additional completion. This option can only be used if the resource “allows multiple enrollments.” Note: If you do not check this box and the user had a previous completion, the system will override (Delete) the previous completion with the new completion/ enrollment date. You must check this box to ensure that no history is lost.
- Saving the records
- If you would like to save this file for later, enter the file name in the box. From now on, the saved file will appear in the Load data from historical file option shown on the first batch load screen.
Once all of the selections have been made, click Next. The system will now process the batch upload.
The final confirmation screen will inform you when your upload is complete.
Related
The Batch Upload Form