
This Online Help page shows you how to manage resources and settings in a Mapping Curriculum.
This includes sections on Adding Resources, Setting Requirement Options and Expiration Options, and Bulk Apply options to all resources in a Curriculum or Curricula Level.
For a new curriculum, the Curricula tab will show the top level folder. This folder will display the Mapping Curriculum title. This title is not visible to end users.
A curricula level will be automatically generated with the title "New Level". You can rename this curricula level by right-clicking and selecting Edit Curricula Level.
The various curricula levels help you organize the resources on this screen. The user will not see any of the levels, they will only see the actual resources that are pushed to their Learning Plan.
Enter the name of each curricula level as you add it. Once a level is created, right-clicking will allow you to edit, delete, or sort the level's contents. Add levels and sub-levels until the curriculum structure is complete.
To add resources to this structure, click the Add Resources button in the toolbar. If you do not see the Add Resources button, click Save to refresh the screen.
The Add Resource pop-up box will appear.

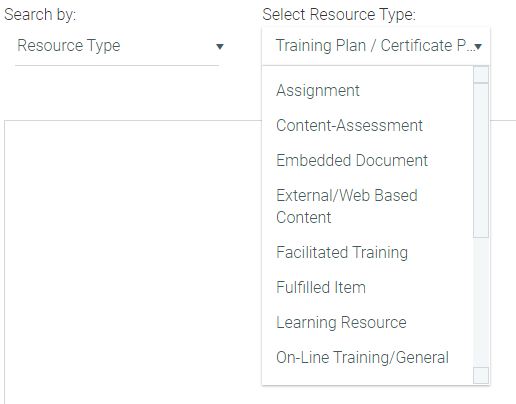
Search for the courses you wish to add. You can search by a specific course title, course provider, media type, resource type, or course category.
When searching by Resource Type, you will need to select the type of resource from the provided drop-down menu. Please note that the default search by resource type (certificate, facilitated training, assignment, etc.) can be changed according to each client's needs. To have your organization's default search by resource type changed, please contact the Support Team.
When adding multiple courses to a curriculum, it is usually quicker to search with broad options so that you can add multiple courses at once. For example, search for a course provider and leave the Course Title field blank.
Click SEARCH to see your Search Results.
Select the resource(s) you wish to add from the list on the left and drag and drop them to the appropriate level on the right. Use the CTRL key to select multiple resources.
By default, only active resources will appear in the results list. Select the Include Inactive checkbox to view/select inactive resources. Inactive resources will have an asterisk next to the title. Inactive resources will not be visible to the end user until the resource becomes active.
Click Update when all resources have been added. The pop-up box will close and the structure with the added resources will display.
Once the resources have been added to the curriculum, you need to define the individual requirements for each resource.
Click on the selected resource to open the requirement options on the right of the screen.
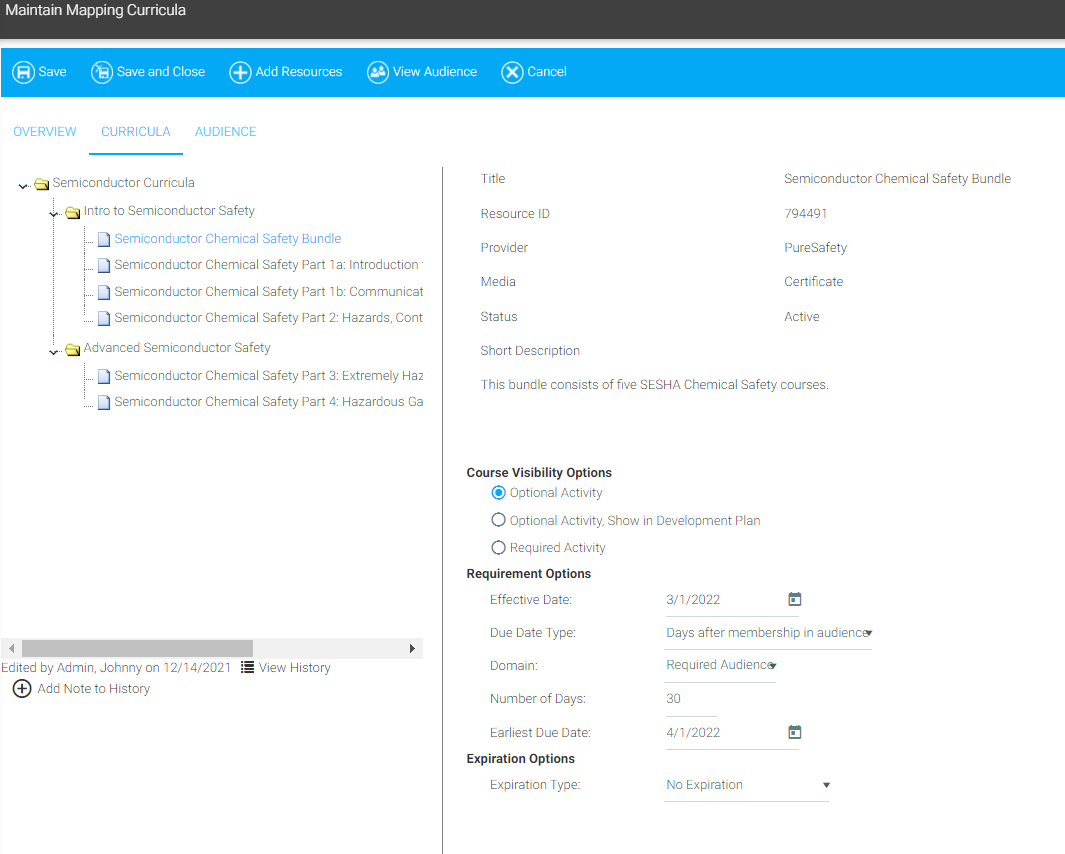
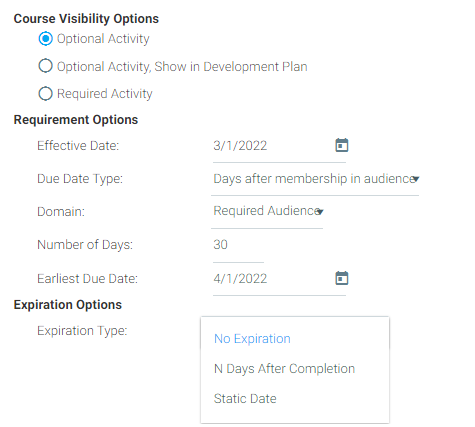
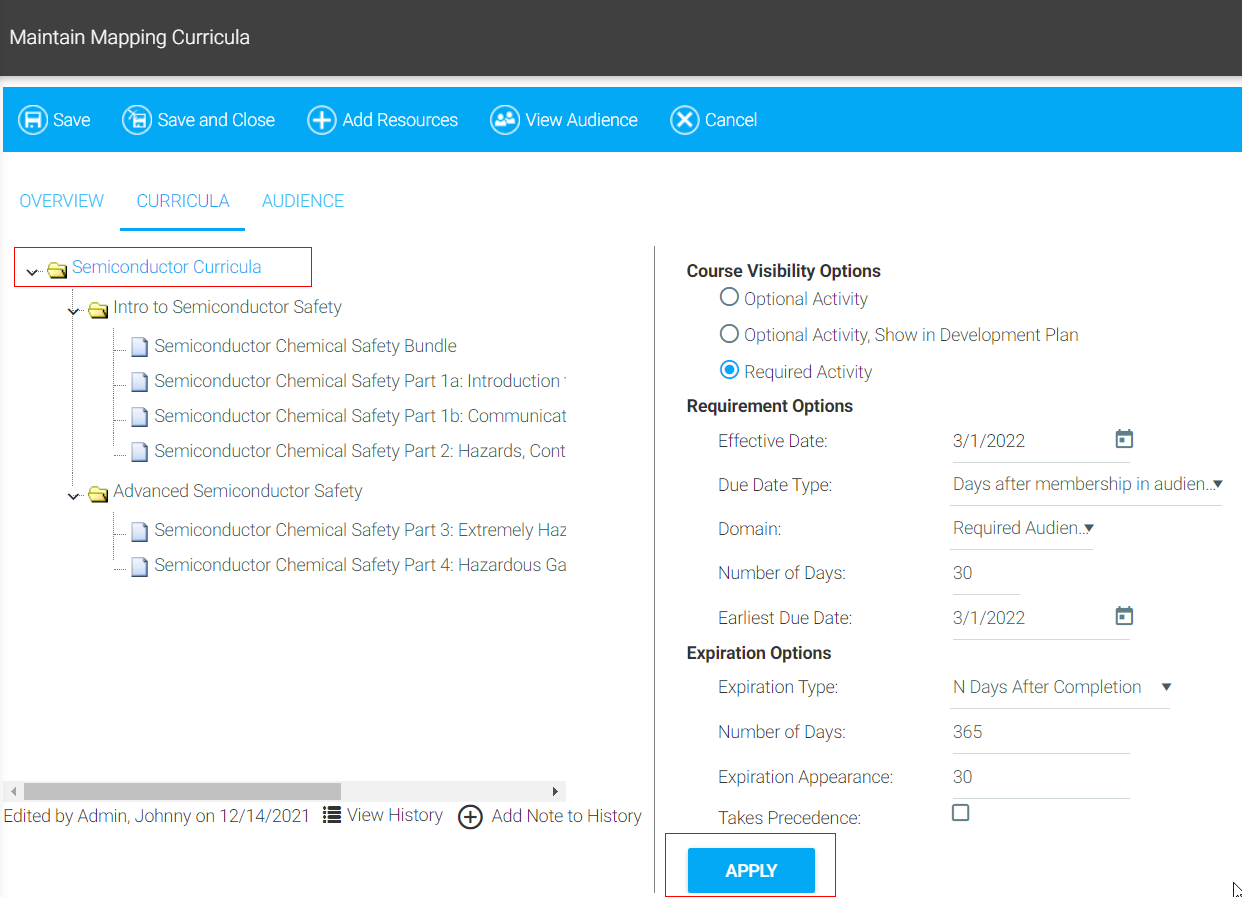
Select the desired Course Visibility option.
.
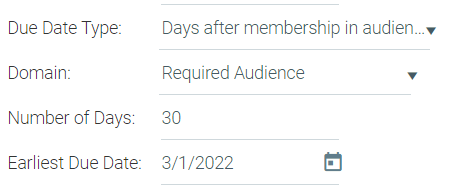
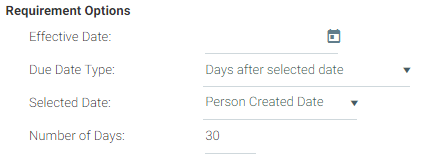
Most of the time, the domain requirement should be Required Audience. This will ensure that the user always receives a due date that is correct relative to their joining the required audience.

As the prerequisite course is completed, the required course will show on the Learner’s plan (unless the effective date of the requirement is in the future).
Even if the due date is well into the future, the course will appear immediately on the learner’s plan.
An issue has been found in LearnShare that could potentially cause training due dates to be earlier than expected. This can happen when a learning resource or mapping curricula audience meets the following conditions:
In this scenario, the due date will be calculated based on domains, but not other criteria in the audience. We will soon release an update to ensure that users are warned before saving any audience that meets these conditions. A future release will ensure that due dates are calculated correctly for any audience that meets these conditions.
Use the Expiration Options section if learners need to periodically retake the course.
This is used, for example, when learners need to repeat a course yearly to be re-certified in a skill or to show compliance with a business practice.
Below is a description of Expiration Options and how you can use them to drive this recurring required training.
Expiration can be used to trigger the learning resource's Required Notifications, just like the initial requirement.
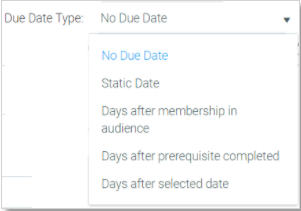
The default setting is No Expiration. To enable Expiration, choose one of the Expiration Type options from the drop-down:
N Days After Completion will require the learner to complete the course, again, N days after the previous completion the learner had with that course. Because Expiration repeats, the previous completion could be the initial required training completion or a completion that was required by a previous Expiration. In any case, this option bases the new completion based on the LAST completion that learner had in the course.
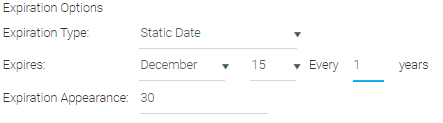
Static Date allows you to set a fixed date that the learner needs to complete the course again, with the new completion date not tied in any way to the last completion.
This can be used, for example, when employees are required to complete a business code of conduct course upon joining the company, but all employees also need to retake it at the end of the year - regardless of their previous completion that same year.
Expiration Type: N Days After Completion
Number of Days: Enter the number of days after a previous completion before a user needs to complete the course again.
Expiration Appearance: The number of days prior to expiration that a course should appear on the user's Development Plan. For example, if a course expires annually and the user should see the course on their development plan 30 days before expiration, enter 30.

Expiration Type: Static Date
Expires: Enter the date the learner must complete the course by, each year (or every 2 years, using the "Every" option).
Expiration Appearance: The number of days prior to expiration that a course should appear on the user's Development Plan. For example, if a course expires annually and the user should see the course on their development plan 30 days before expiration, enter 30.
Requirement and Expiration Options can be set once, at a Folder level and then applied to ALL Resources below that folder.
These resource options can be "bulk applied" to ALL resources in the curriculum or applied only to resources inside a "curricula level" (folder icon).
This can be a time-saving tool for the admin - both for initial setup and for making mass changes to resources inside the curriculum if requirements change.
If the requirements truly apply to all resources in the curriculum (or in a sub-folder), this can also help maintain consistency across the resources.
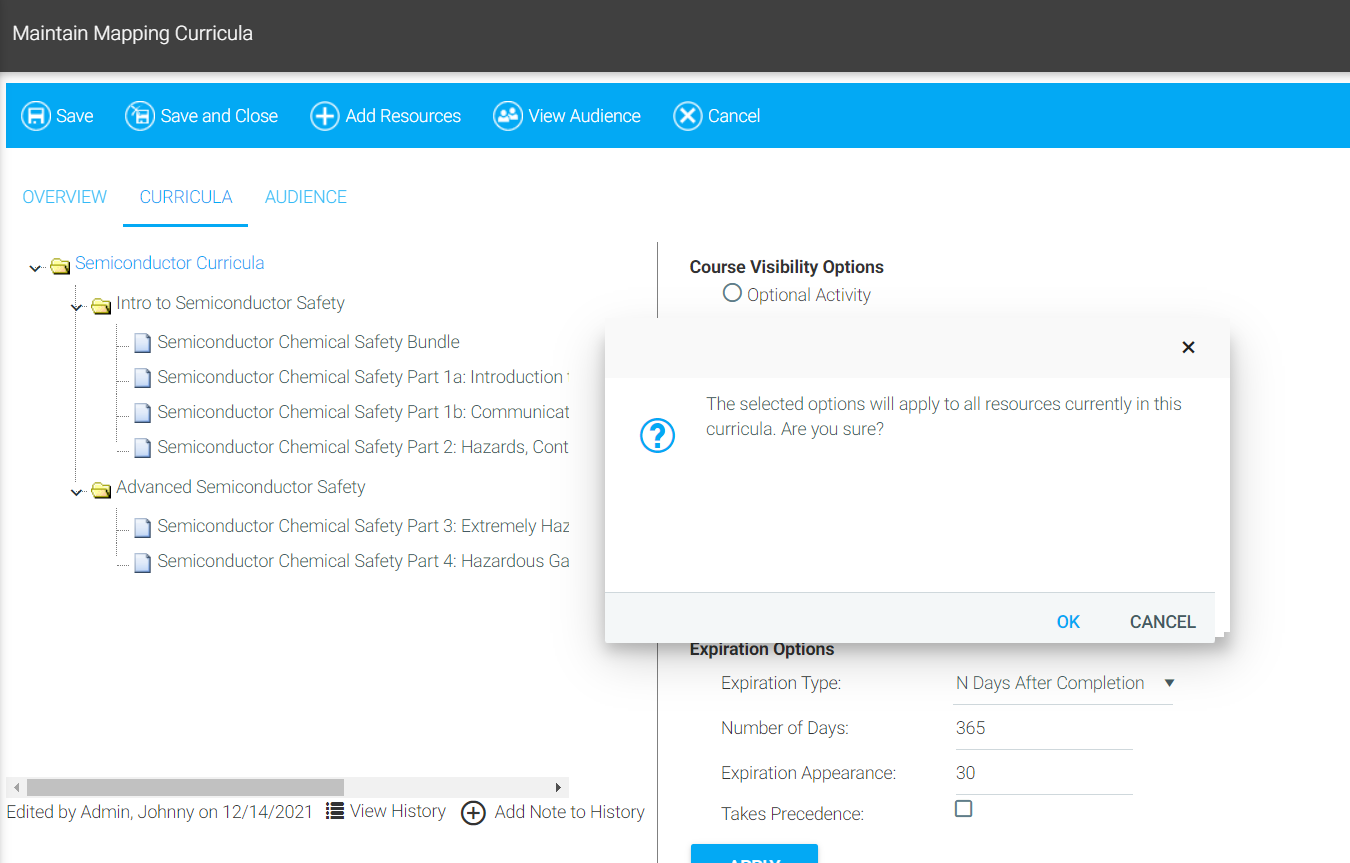
The bulk apply action writes over any options that might have been previously set on individual resources, within the curriculum or curricula level chosen.
If this is done in error, you can undo the action by selecting the Cancel button and exiting out of the Mapping Curricula - being aware that any edit session changes will be lost.
Examples for how to use this feature are below.
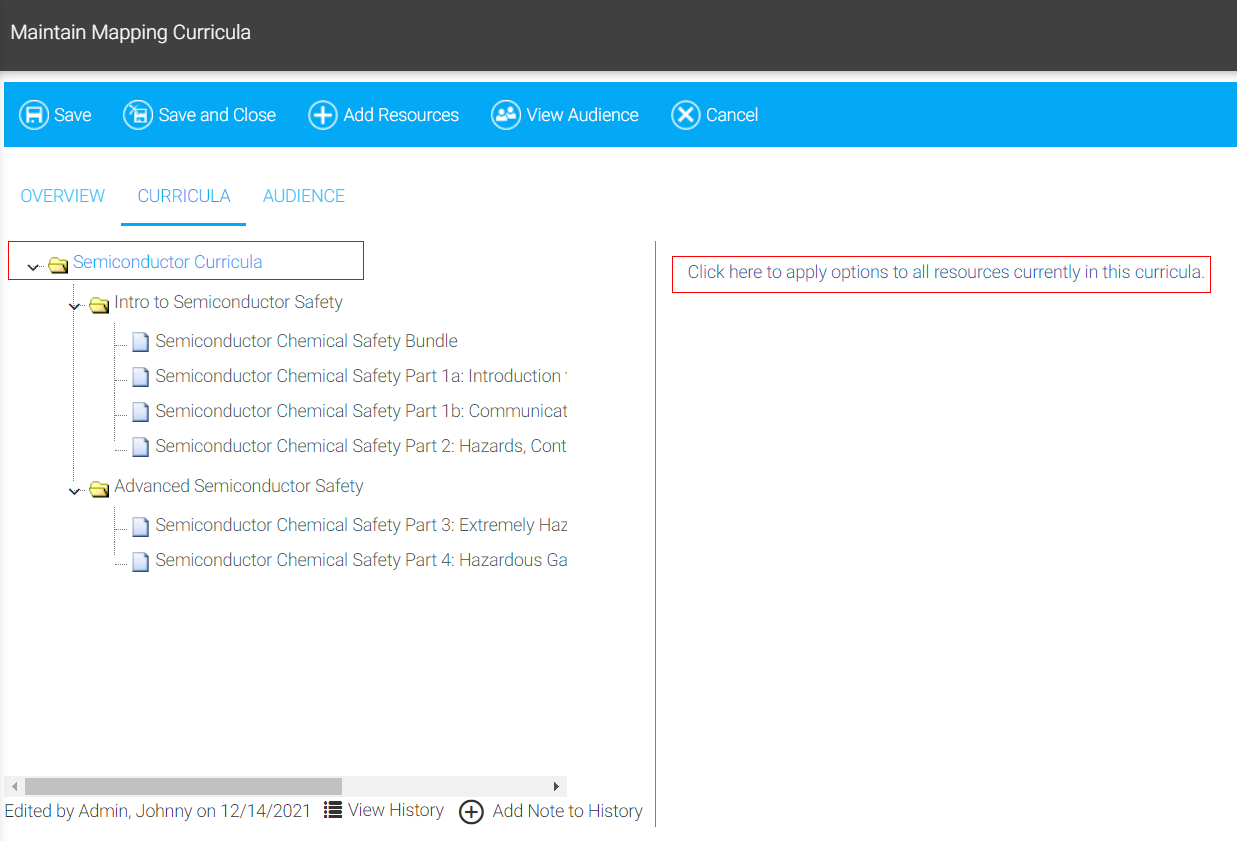
The Curricula tab presents the Curriculum structure - folders and resources - in the left pane. The right pane has a link the admin clicks to define bulk apply options.
In the example below, the entire Curriculum structure has been selected, and the Apply Options link (Click here to apply options to all resources currently in this curricula.) to the right should be clicked to start the process.
After selecting the Apply Options link, the admin configures the Requirement Options and Expiration Options as desired.
Clicking the APPLY button will apply these options to all resources in the Curriculum - AFTER the confirmation pop-up is OK'd.
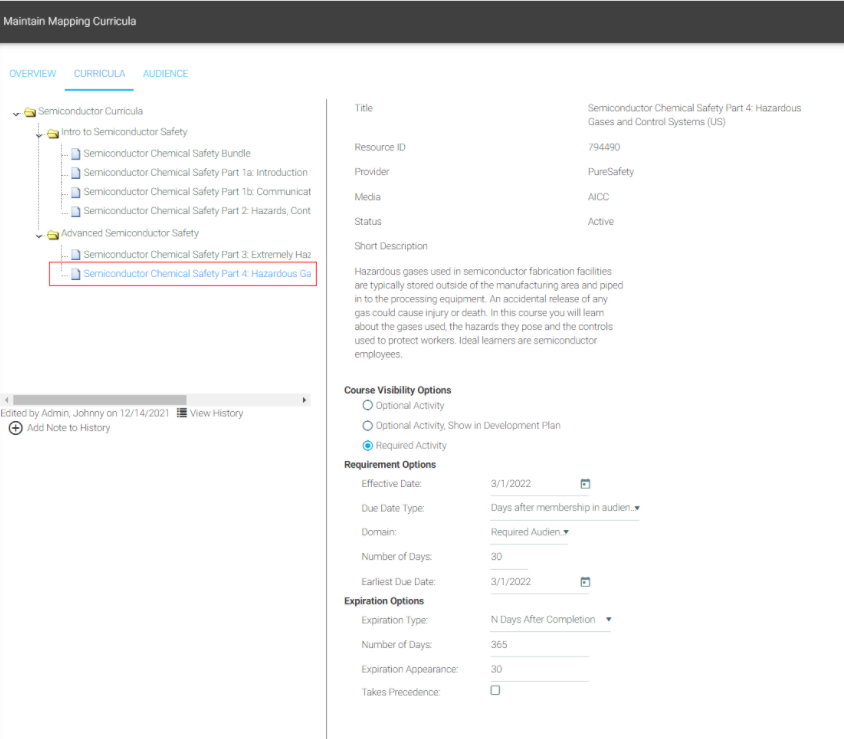
After clicking OK, and the options have been applied to all resources in the Curriculum, the admin will see the effect of this on the other resources.
Here is an example of one of the resources that has had it's Requirement and Expiration Options set by the bulk apply action above.
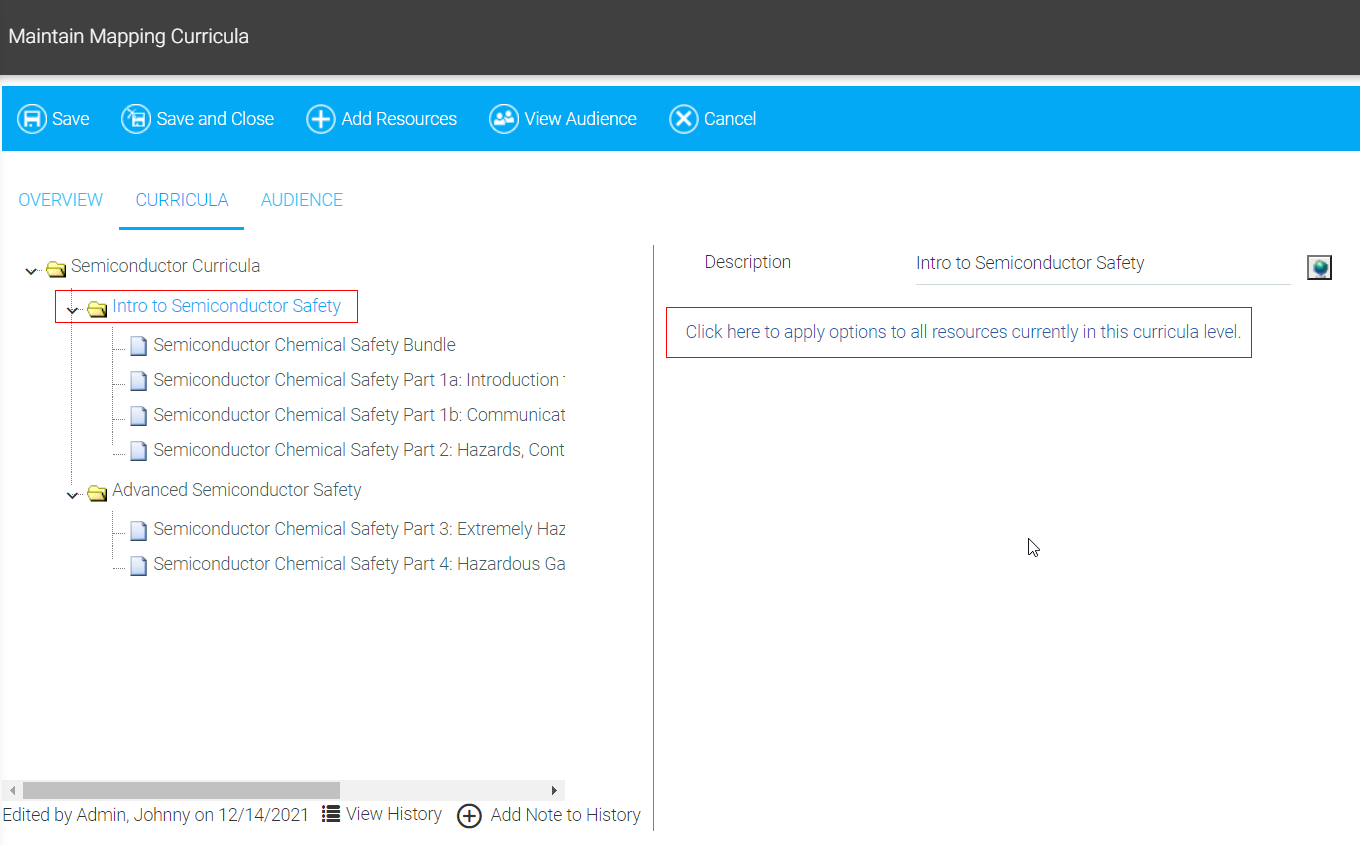
Last, the same bulk apply action can be restricted to apply resources that are only in a curricula level (folder) of the Curriculum.
Selecting a folder will show the following link in the right pane. The admin takes the same steps as above, but the scope of the bulk apply will be restricted to that folder.
Once the resource requirements have been set, you may notice an R next to resources that are now required and an O next to resources that will be visible as optional in the Development Plan. Remember: Even though an inactive course is marked as required, it will not actually be required and visible until the resource is active.
When all course requirements have been set, click Update. Repeat the above steps for each resource.
To make the requirements and expirations active, click Save on the resource.
Create, Modify, or Deactivate Curriculum
Define Audience Mapping for a Curriculum
Add or Modify Resources in a Course Catalog Curriculum