Using the Import Facilitated Session Wizard is a quick way to bulk-load data about facilitated training without individually setting up classes, enrolling users, and marking them complete or not. Data is organized in a Microsoft Excel spreadsheet and then uploaded to the learning management system. Changes take place immediately and cannot be undone, although they can be overwritten.
The following types of data can be imported using this function:
This is often useful when a large number of class sessions must be created or when a large number of enrollments or completions must be processed. This should not be used to process completions if users have already enrolled in a class session. This should only be used to enroll and grant completion to users in one step.
When using the Import Facilitated Session Wizard for enrollments or completions, the class instance must already exist in the LMS. If you need to create a new class instance and process enrollments/completions in one step, use the Batch Load ILT Classes.
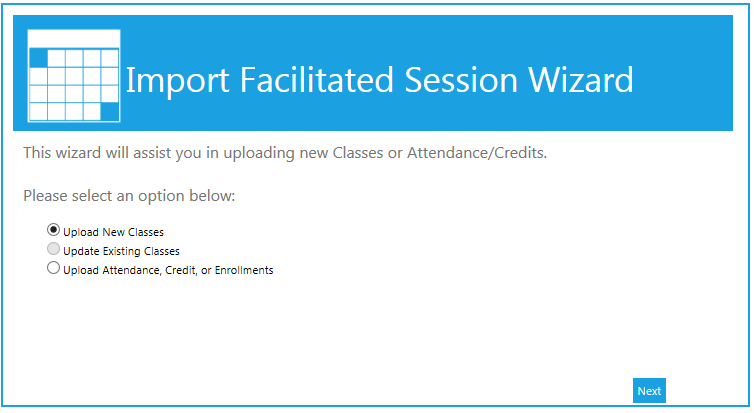
The Import Facilitated Sessions Wizard can be used both to upload new classes and to load attendance, enrollment, and credit data. To start the wizard, go to Resources > Import Facilitated Sessions Wizard in the administrative console. The wizard will open in a pop-up window.
Select the type of upload you want to do: a new class, an update to an existing class, or attendance/credit/enrollment data.
If you have already created the upload file, select either:
If you have not yet created the file, you may select the option to Generate Template. This will create an Excel file with appropriate columns. If you are importing new classes, the template creator will prompt you to select the number of class dates per session for multi-day classes. You can use the template to create more than one class at a time, so enter the number of days for the longest class that you are going to create. Then click the Generate Template button. The template will open up in Excel. Refer to the How to Complete a Class Session Template or the How to Complete an Attendance Import screens for instructions on how to complete the template.
If you elected to Import the file, you will be prompted to select whether the file is in .csv or tab delimited .txt format and then navigate to the file to upload. Once the file has been selected, click Next to continue.

If you elected to Import from the clipboard, you can paste your data into the open field. If you choose not to include the header row, uncheck the box at the bottom of the screen. Once the data has been pasted into the field, click Next to continue.
If the uploaded data contained any errors, the system will specify the exact error. Correct the errors on your spreadsheet, then click the Previous button to re-upload/re-paste the data.
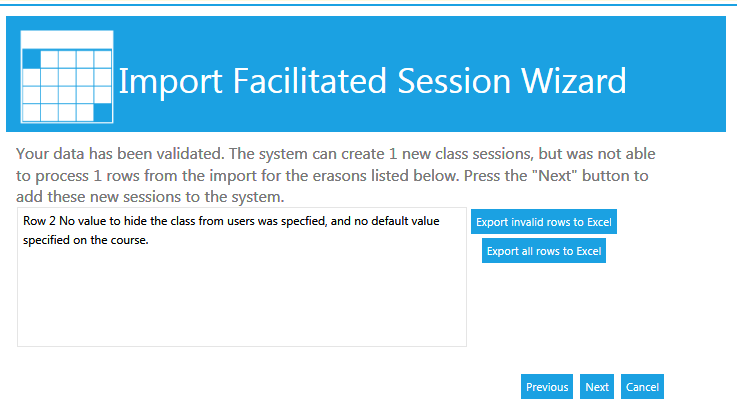
Once all of the data has been validated, click Next to create the sessions or add the data. The system will then confirm that all of the sessions have been created or that the data has been added.
One spreadsheet can be used for multiple class sessions for one or more different courses. If a single user is in more than one session or course, be sure they have a separate row for each session or course in the spreadsheet.
The column definitions and guidelines are listed below:
| Column | Data | Description |
|---|---|---|
|
A |
Class ID |
If you enter the Class ID, then you can skip columns B-H. OR You can leave this field blank and enter the class information in columns B-H. To find the Class ID, you can look at the the Class Session Schedule report or you can create an ad hoc report that contains the Class ID field. |
|
B |
Course |
The title of the learning resource that this class is associated with. This value can also be the resource ID of the course. When provided with a title, the system will try to match the title with one on file. When provided the resource ID, the system will use this value as the unique identifier for the course. |
|
C |
Class Date |
Date of the first class, in MM/DD/YYYY format. |
|
D |
Class Start Time |
Start time of the first class. You can use either 12 hour or 24 hour time formats (e.g., 8:00 AM or 16:00). |
|
E |
Time Zone |
Time zone for the class (e.g., EST or CST). Use the codes shown on time zone drop-down menu in Maintain Facilitated Sessions. |
|
F |
Instructor |
The username or employee ID of the instructor who will lead the class. If there is no Instructor associated with this class, this field can be left blank. |
|
G |
Venue |
Venue ID or name. This field is case insensitive. You can leave this field blank if your system is configured to not require a venue. |
|
H |
Room |
Optional: If using rooms, this is the Room ID or name. This field is case insensitive. |
|
I |
Employee |
The username or employee ID of the user. |
|
J |
Date |
The completion date if the upload is being used to process completions. For enrollments or drops, this field can be left blank. MM/DD/YYYY format. |
|
K |
Type |
Enter one of the following letters:
|
|
L |
Time |
Optional: Enter the length of the class in minutes (for completions only). |
|
M |
Score |
Optional: Enter a score for the user (for completions only). |