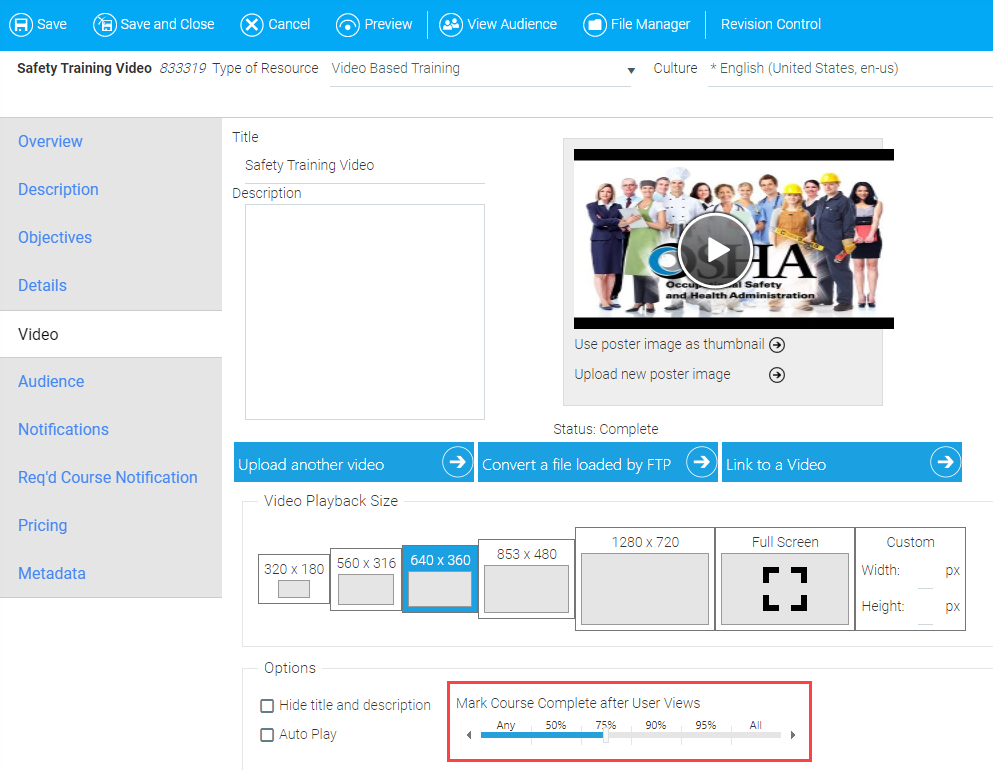
Setting Up a Video Course

  1. From the Administrator's Home, open the Navigation Bar on the left of the screen.  Click Resources, then select Maintain Learning Resources.


  2. Click New in the top Tool Bar.


  3. The following screen will appear with the Overview tab displayed.  Select Video Based Training from the Type of Resource drop-down.


  4. Assign a Title to the course by populating the Title field.  The Short Description field is optional, but can be helpful in ensuring that users understand the purpose of the training.


  5. Populate the Time Required field.  The duration of time required to complete the course should be entered here.

  6. Use the Resource Status drop-down to indicate the status of the video course (e.g., Active, Inactive, or Retired).  Users will only be able to access the course if the Resource Status is set to Active.


  7. Select Video from the Media drop-down.


  8. Select the Provider of the video content from the Provider drop-down.


  9. Optional:  Check the Allow Multiple Enrollment box to allow users to enroll in the course more than once.  For best practice, it is only recommended to check this box if users will be required to retake the course on a regular basis.
     
  10. Under the Description tab, enter the Long Description of the course.  You may copy the text from the Short Description field on the Overview tab if necessary.


  11. Optional:  Under the Objectives tab, enter the Learning Objective(s) for the course if applicable.
     
  12. Click the Details tab.  Assign a Primary Category or Categories to the course.  You can also use this tab to designate Achievements Upon Completion, Ratings and Evaluations, as well as CEU Credit(s).


  13. Use the Owners sub-tab to populate the Course Owner field under the Person column.  You must also populate the Instructional Designer and/or Content Owner fields under the Person column.  Both fields are not required, but one must be present.


  14. Optional:  Enter prerequisites for the course under the Prerequisite tab, if applicable.
     
  15. Select the Video tab.  Click the Upload a Video button.


  16. The Upload window will appear.  Click the Upload button (blue arrow) and locate the file on your computer.  Select the file, then click Open to upload it.


  17. Enter the title of the video in the Title field.  The Description field is optional, but can be helpful in ensuring that users understand the purpose of the video.  Both the Title and Description should match the Title and Short Description from the Overview tab.


  18. Set the video's playback size by clicking one of the icons in the Video Playback Size field.


  19. Under Options, you can set the scroll bar for Mark Course Complete after User Views.  Slide the bar to the percentage of the video that must be watched before the user will receive credit for viewing it.
     
    Note

    It is recommended that the scroll bar be set to 95% or less.  If the scroll bar is set to All, this will require users to play the video to the end of its run time in order to earn completion credit for the course.


  20. Optional:  Check the Auto Play box to have the video play automatically when a user attempts to view it.


  21. Click the Audience tab.  To set up the course's audience, follow the instructions provided in About Audience Mapping and the topics that follow.  Best practice is to leave the selections under the Primary tab unmodified.

     
  22. Click the Notifications tab.  Check the Enable box to enable notifications.  Then, enter the course title in the subject field.
     
    Note

    Some organizations have notifications for required resources enabled by default.  If this describes your organization, please disregard this step.


  23. If the course is going to be required, follow the instructions in this Step.  If the course is NOT going to be required, skip to Step 24.
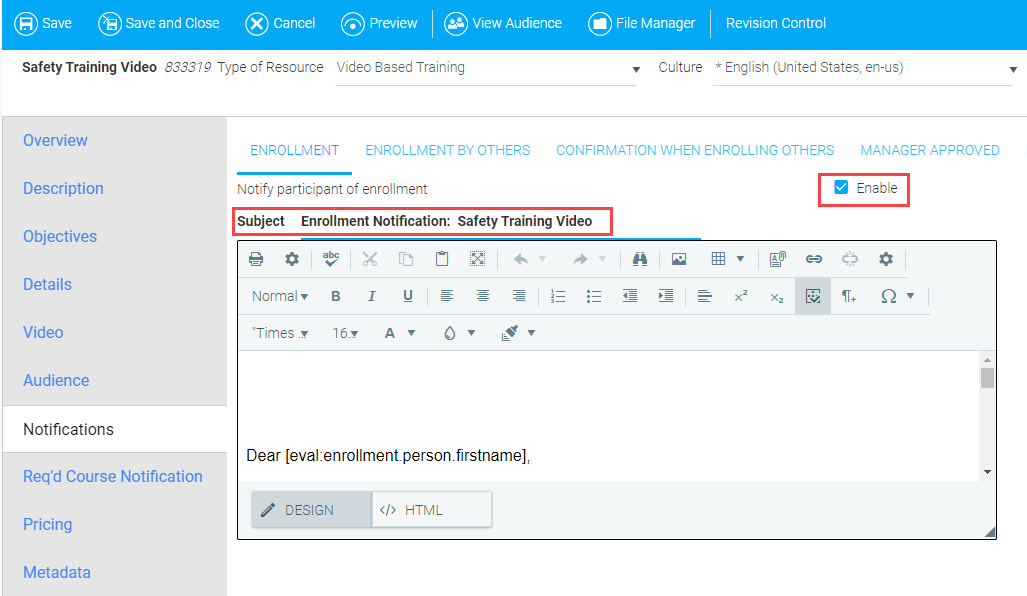
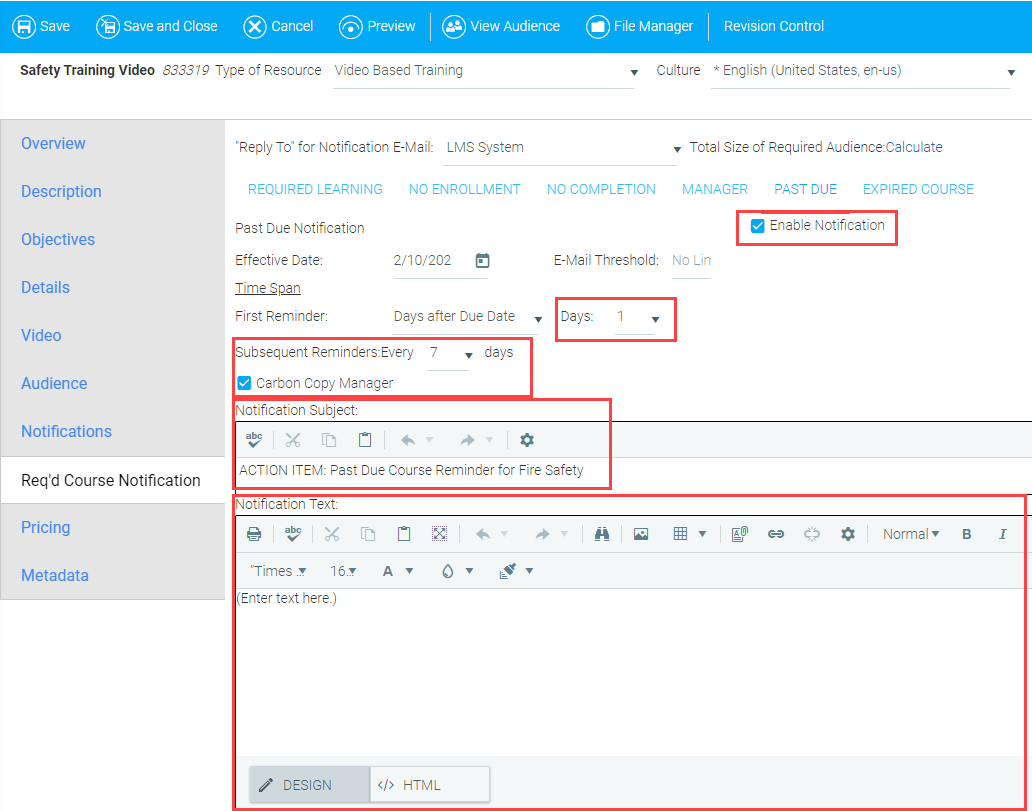
    a.  Click the Req'd Course Notification tab.  Check the Enable Notification box.
    b.  Enter the subject in the Notification Subject field (e.g., "ACTION ITEM: ").
    c.  Enter the message that will be sent to the audience in the Notification Text field.


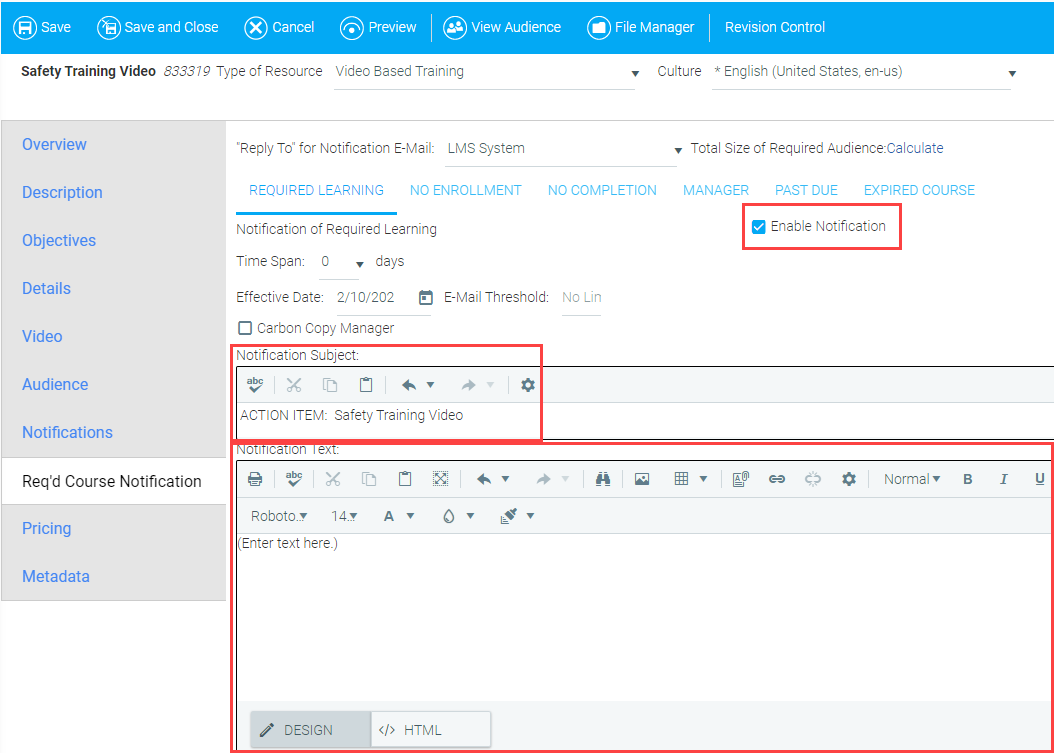
    d.  Optional:  If desired, click the Past Due sub-tab and check the Enable Notification box to send a notification to the audience when the course is past due.  Select the number of days after the due date when a user will receive a Past Due Notification from the Days drop-down menu.  Use the Subsequent Reminders field drop-down menu to select the number of days that must pass before a user will receive an additional notification.  Check the Carbon Copy Manager box if you wish to copy the user's manager on these notifications.  Lastly, populate the Notification Subject and Notification Text fields.

  24. Under the Metadata tab, click the Time Description sub-tab.  In the field provided, enter approximately how long it will take a user to complete the course in quarter-hour increments (e.g., 15 minutes = 0.25 hours).


  25. Click the Save button in the top Tool Bar to save your selections. 
     
  26. Return to the Overview tab and confirm that the course is set to Active.  Then, add the course to the Course Catalog.  See Adding a Course to the Course Catalog for instructions.

For a brief video on this topic, please see Setting Up a Video Course.

Related Links

The Overview Tab

The Description Tab


The Details Tab

The On-Line Tab

The Audience Tab

The Pricing Tab


The Metadata Tab

Using Video as a Course

Video - Frequently Asked Questions

Optional Information for Video Courses

Adding a Course to the Course Catalog